How to Download Blender 2.8 on Mac
Blender 2.viii Tutorial: Motion Tracking on Mac

Mar 31, 2022• Proven solutions
Move tracking refers to tracking an object's motion and further applying the same tracking data to other objects' move. It can exist another layer or an effect control indicate. Yous tin also track multiple items in a scene. So, existence an animator, whether beginner or professional, you can't ignore these motion capture technologies. The motion tracking, especially the Blender motion tracking, will give you a realistic animation experience, as discussed beneath.
Part 1: Movement Tracking in Blender 2.viii
Blender two.8 got released final yr with new and exciting features that users were waiting for a long time. All in all, it is a game-changer for the manufacture due to many reasons. Some of those reasons could be ease of use, real-time rendering, powerful viewports, improved animation editor, and professional person and realistic touch to the entire platform.
So, here are some uses of Blender 2.8 move tracking.
- The primary awarding of Blender motility tracking is to stabilize the footage or heart it with the few given markers.
- Another use of motion tracking is to identify 3D models.
- With motility tracking in Blender 2.eight, you can place 2nd models or outcome layers into a video every bit if they are real characters.
Follow the 6 simple steps to utilize the camera tracking feature of Blender 2.8 to extract the movement of the photographic camera from footage and further create an explicit digital scene that well compliments.
Part ii: How to Rails an Object in Blender ii.8 on Mac?
Let's first learn the detailed footstep-by-step Blender object tracking tutorial equally follows.
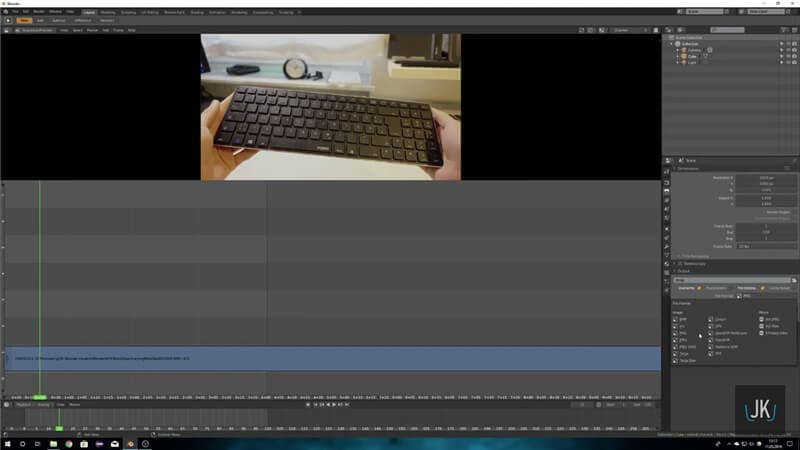
Stride 1: Catechumen video into the image sequence
Load your video into the sequence editor Blender. And so, set your Offset and Stop frame at 1 and 100, respectively and render the epitome format to JPEG because of small size images.
Step 2: Start object tracking
Become to the Motion picture Clip Editor and go to the frames. Select the Runway tab given on the right side and hitting the + icon on the Camera tab to select Object.
And then, it goes like the Track > Photographic camera > Object.
![]()
Stride three: Ready scene frames and prefetch the whole clip
Enter the right sensor width. You can Google likewise to know the proper sensor width. So, become ahead, and press Detect Features to delete all the markers that won't work. Then, press Ctrl + T.
When all the tracking markers track correctly, go to the Solve tab, and select Solve Object Motion. Endeavor to go the Solve error below 0.five.
![]()
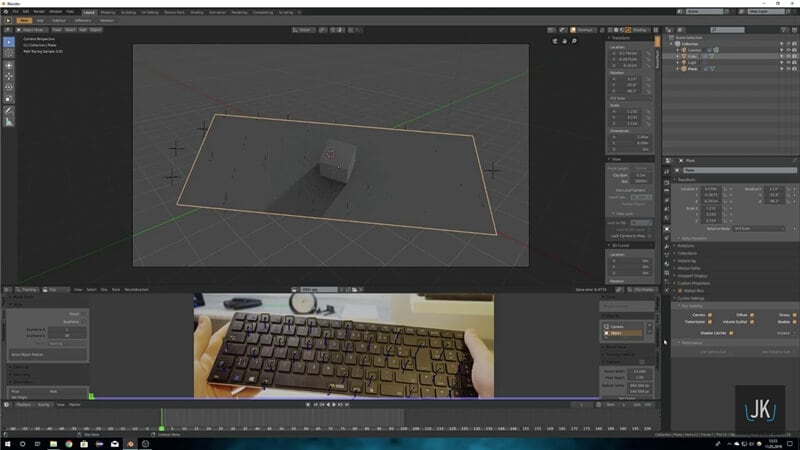
Footstep 4: Align the object in Blender object tracking tutorial
Go ahead and set the Render Engine to Cycles and set the video in the background. Become to Overlays on the top and checkmark the Move Tracking.
![]()
Now, set the constraints on the side. Gear up the Object as Object and Camera to Camera and try to align the Object on tracking points to sit down well over there.
Practice the same thing with plane, which is the shadow catcher. You can copy the Location and Rotation so that it sits on the cube.
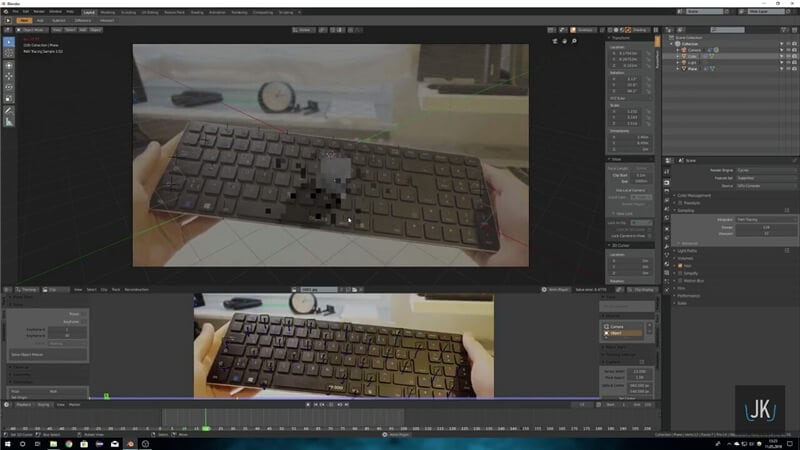
Pace 5: Make some settings
After you position everything, go to the Cycle Settings and checkmark the Shadow Catcher.
Also, gear up the Background equally Transparent. Yous tin now see the object with its shadow over the area you lot want to track.
Step six: Position the calorie-free correctly
It helps to know when yous filmed, and you as well become to know the low-cal source. Notwithstanding, one light source is better for 3D work because it would be tough to replicate with complicated lights.
![]()
Then, you can test render to see if all goes right.
![]()
Part 3: How to Do Camera Tracking in Blender ii.8 on Mac?
Yous all know that placing a 3D model over footage won't wait good if you don't make efforts to make it real. If it's the case with you, too, the camera tracking feature of Blender 2.8 volition not disappoint y'all.
Get introduced with half-dozen simple steps on how to practise motility tracking in Blender 2.8 on Mac devices.
Step 1: Gear up the Media
Yeah, for Blender ii.8, offset prepare the media into a specific format. After recording and transferring the video to your Mac process is over, launch Blender 2.8, a free plus an open-source platform.
Open Blender 2.8, select Video Sequencer, and hitting the Add button to convert video format into an image sequence. And then, become towards the right bill of fare and click the Output tab to salvage it in PNG format.
At present, become to the top-left menu and select Render > Render Animation.
![]()
Step 2: Import Prototype Sequencer
Open a new Blender instance afterward your video clip turns into a pile of images. At present, you need to select all the images by clicking Picture show Clip Editor > Open. Select all the images past pressing A on the keyboard.
Check how the video is playing inside the Blender and if information technology is playing wearisome, click the Prefetch > Prepare SceneFrames button to lucifer the full number of video frames.
![]()
Footstep 3: Add Tracking Markers
Offset of all, you are required to change the Tracking Settings as follows.
- Change Loc to Affine under Motion Model.
- Check the Normalize.
- Change the correlation value from 0.75 to 0.ix nether the submenu Tracking Setting Extra.
Then, add together at least eight markers on the areas of footage that are easy to track. You tin can choose white stones on a dark floor, golf ball on the grass, or unlike tiled floor patterns.
Hold Ctrl key and correct-click to add together the trackers. So, the small white squares will appear, which you demand to place over the footage you want to track.
You can press the "S" key to scale upward the markers.
![]()
Step iv: Track the Footage
It'southward time to rail the footage after yous consummate placing the markers. You can press Ctrl + T or Alt + Right-arrow to track the existent footage.
![]()
Step 5: Solve Camera M otion
Solve the photographic camera motion every bit follows.
- Click the Solve tab on the left department.
- Check the Keyframe.
- Under Refine, change Nothing to Focal Length, Optical Eye, K1, K2.
Lastly, hit the Solve Camera Move button. Retrieve to keep the average error below 0.5 for expert results by enabling the Info box under the Clip Display tab.
Now, y'all should delete the markers with the high average error, or y'all tin lower their weight by reducing to 0.half-dozen under the Runway menu.
![]()
Step 6: Set up 3D Scene
After tracking the footage, the final steps are to brand some 3D settings. Get to Scene Setup under the left-menu and striking the Setup Tracking Scene button.
Then, go back to the Movie Clip Editor and admire the following options under the Orientation card.
- Floor
- Wall
- Prepare Origin
- Set X-axis
- Set Y-axis
- Set Calibration
Choose i tracker to exist the origin, the one to a higher place it to exist the Y-axis, and the side tracker to the source to be the X-axis. So, choose three trackers making your scene flooring more or less and hit the Floor button.
Lastly, you need to choose two trackers to set an appropriate scale.
So, here ends the Blender motion tracking tutorial!
Part four: How to Fix "Blender Motion Tracking Not Working" on Mac?
After learning Blender motion tracking animation, you volition confront the post-obit troubleshooting problems. Don't worry as we will discuss the solutions below.
- Ready the " Some information failed to reconstruct" error
This error usually comes while trying to solve the photographic camera motion. If information technology persists, make sure you have added at to the lowest degree 8 trackers, as discussed above, in the proper tracking steps. You should rail them correctly tracked for every frame you employ.
On the other hand, you lot should as well cheque whether the photographic camera and lens settings are to their right values. After doing all the correct steps of Blender move tracking, the trouble volition most probably become resolved.
- When red marks come and tracking stops
If you get to see red marks while tracking the footage, it will of a sudden stop monitoring. Well, information technology'south a common issue if your footage is pretty hard to follow.
You can solve this effect by selecting the markers that stopped working. You are required to resize them and create a new keyframe for the tracker to aid correctly track the footage. Sometimes y'all may need to resize them more than once and repeat the process until y'all are correct all the markers that stopped working.
If the issue persists, leave that marker alone and try to supervene upon it with a new mark.
These are the two well-nigh common troubleshooting bug establish with regards to motion tracking in Blender2.8.
Conclusion
Hopefully, you have clearly understood every attribute of Blender 2.8 movement tracking or camera tracking in the in a higher place tutorial. Movement tracking is a crucial skill if y'all are into Animation and want to go professional in the time to come. If that'due south and so, make sure to nurture your motion tracking skills through similar tutorials, where y'all also learn the common troubleshooting bug.
How to Download Blender 2.8 on Mac
Posted by: laynesume1971.blogspot.com


0 Komentar
Post a Comment